7. Security Measures

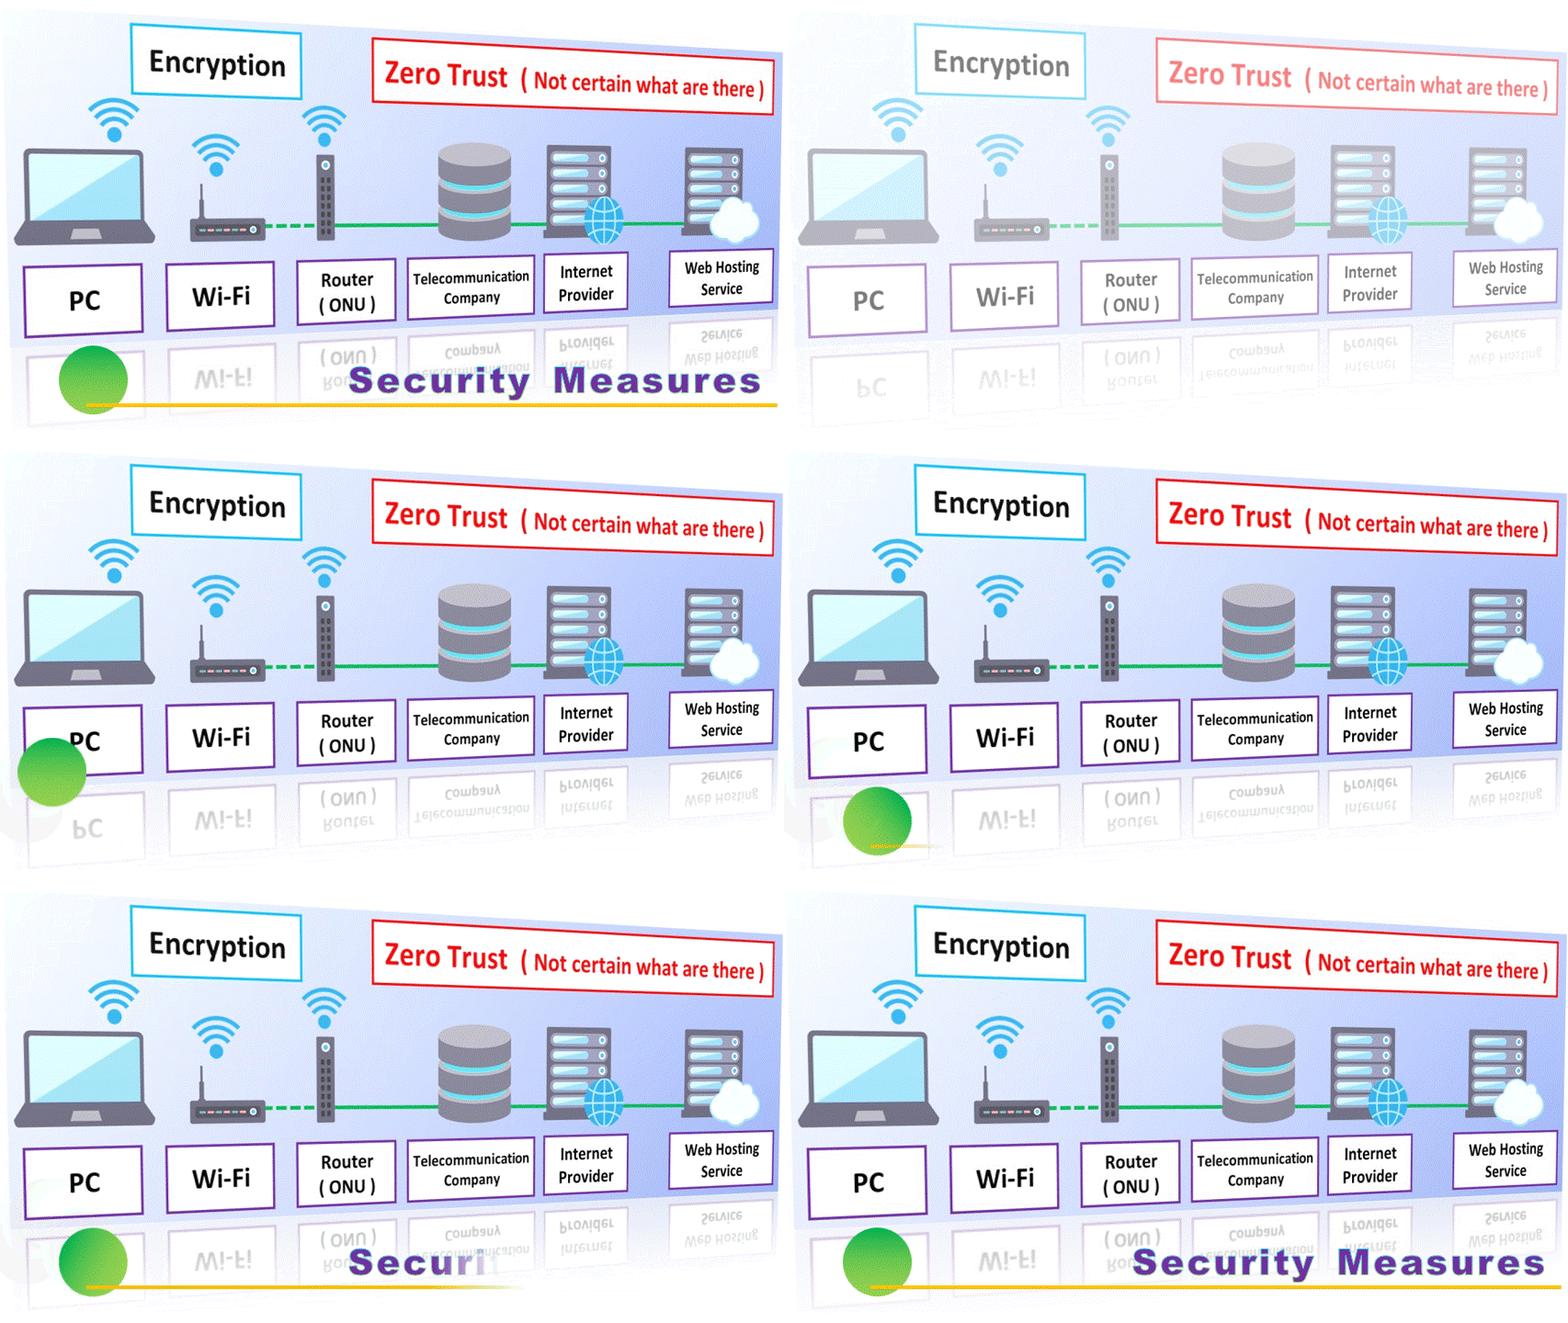
Security on Telecommunication

Zero Trust —— I can’t trust the internet ! —— that’s not true (^_^;. It means to ​​build a secure telecommunication method on insecure telecommunication environment. IT words are very difficult.

The point to create Zero Trust security is the encrypted communication.

On the hardware, it is effective to use Wi-Fi. It’s okay if the telecommunication method is WPA3 ( Wi-Fi Protected Access 3 ). To tell for the machine, it’s Wi-Fi6 or higher. When you upgrade your Wi-Fi settings from the old type, there is a case of the old telecommunication method has remained. Don’t forget to update the driver.

Security on Hardware

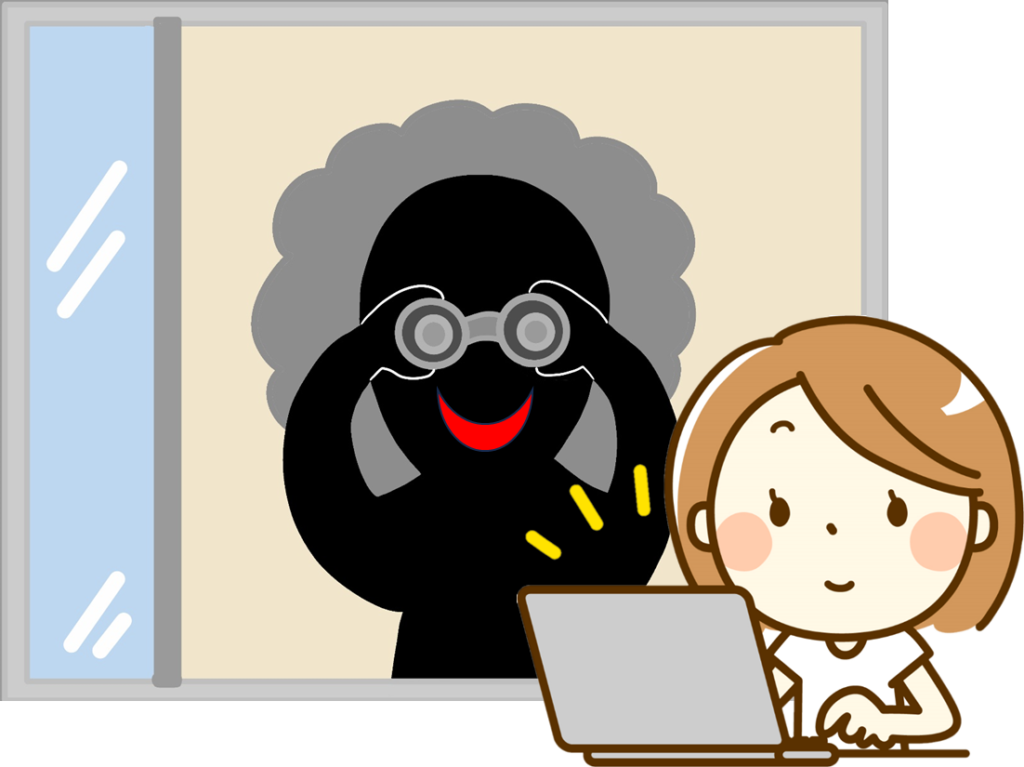
First, consider the place of computer. The screen is not faced on the window. It prevents anyone from seeing your computer.

Also, you should lock the screen on both your computer and smartphone. The screen will be locked when returning from power saving mode. However, when a computer returns from this, it is not automatically locked like a smartphone. It needs to configure the settings.

The setting is below.

Lock the Windows screen automatically
Lock the Windows screen automatically. It is a useful way when you leave a seat instantly but you have takes much longer...

security on software

WordPress is an open-source program published on the Internet. The alerts are issued as soon as security vulnerabilities are discovered, that makes it difficult for computer viruses to be installed. It is like anti-virus software is running all the time.

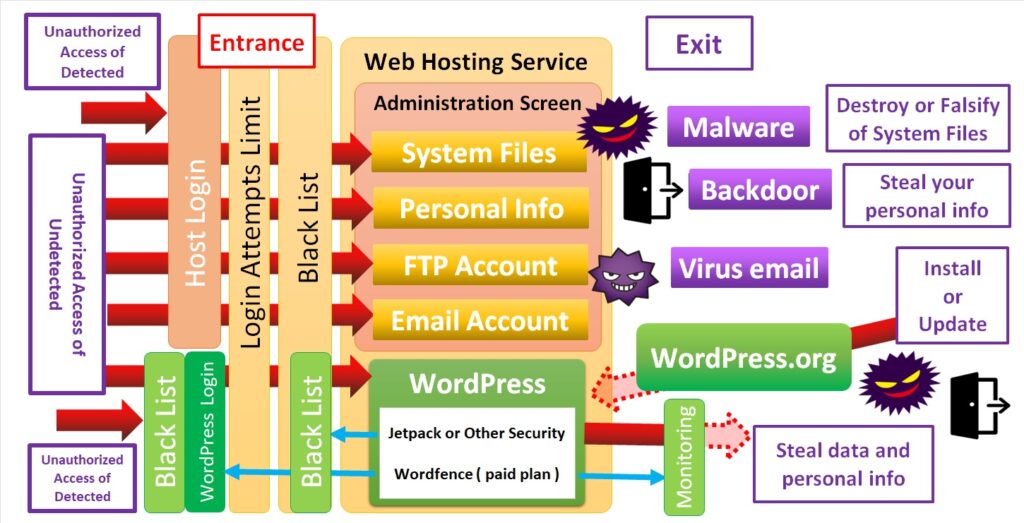
Actually, there is no hosting service which can block the system falsification from hackers completely (-_-;). Some attempts can be blocked, but not all. It is called ” cracking “.
As all web application files are managed by URLs, anyone can access the files directly from the internet. However, it requires to login as an authorized user, so we only pay much attention to prevent hacking. It is called ” Entrance Control “.

WordPress.com has the best security in this regard now.

Well, I will introduce two examples, which are WordPress.com and Bluehost. I can recommend to use them.

Security on WordPress.com

If you set your original password, go to the above security screen, then generate a strong password.

This is for Windows
This is standard editor “Notepad”

Press button to make the password visible, save this password as a text. It is good to save with your ID. Then save it to USB memory, and hide it somewhere. Do not stick your ID & password on the monitor.

Lastly, press to save this password.

Pasting it from the text above, you can enter your ID & password correctly.

Next, follow the WordPress.com navigation. Set up your ” Recovery Email ” and ” Recovery SMS Number “.

WordPress.com also allows you to login by using your Google account or Apple ID. It makes you easy to access your site. It is very useful when using the mobile app ” Jetpack – Website Builder “.

When you press the button , a navigation window appears. Follow this navigation and save your ID and password to your Google account or Apple ID. If you don’t want to send your personal information online ( it’s more secure ), don’t do it. However, it’s a bit painful to enter a strong password of WordPress.com to your mobile app (^^;.

Then next, set up two-step authentication ( 2FA ). On WordPress.com, once the authentication has been successful, the authentication screen will not appear again. You can keep a passwordless environment.

However, you have to set up the mobile app ” Jetpack-Website Builder ” before you configure 2FA. This app is very useful with synchronizing Jetpack, which can keep your site secure and analyze, but initially, this app cannot access your site after 2FA has configured. So you have to finish the initial setup before 2FA is done.

This is old version of Jetpack-Website Builder, but way to setup is almost the same.

Use Authenticator for 2FA. WordPress.com also supports a method using SMS ( short mail ), but Authenticator can have the higher-level encryption. Using an Authenticator is definitely recommended.

When QR code is displayed, save the QR code as an image first, instead of using Authenticator. You can capture it by pressing ” ” on Windows, and ” Shift + ⌘ + 4 ” on MAC. Then click on the image thumbnail which appears in the lower right corner. You can launch the image editing software ( if not, launch the image software separately ), and save it as an image.

You take a photo with Authenticator’s camera from this image.

QR codes can be read from image files.

Window’s standard image editor ” Snip & Sketch “
Then open this image file

After opening the QR code image, activate Authenticator on your mobile then take a photo.

After the QR code of 6-digit number is displayed, enter these numbers to . If this authentication is successful, you will not fail 2FA as long as you keep this image file.

Security is increased because it’s not needed to backup to internet.

Also save the one-time backup code as an image ().

When you can read QR code from an image file then enable two-step authentication, you can establish a strong zero trust environment.

You got it !

Next is for Bluehost.com users. WordPress.com users will jump to Security on a WordPress site.

Security on Bluehost.com

Most Web hosting services don’t need to change settings specially. They are made with user friendly. But if you want to elevate the security of your sites higher, it needs to change the settings.
Also to know the system, you should check them all. It would be done by like this order.

1. Encryption ( SSL/TLS )
2. Reset password
3. WAF setting
4. Access Log setting
5. FTP setting
6. Email setting
7. Backup ​​setting
8. Other settings
9. 2FA ( Two-step authentication )

Bluehost has 2FA from the beginning. It is similar to Google prompt. Bluehost has high security at this point.

1. Encryption ( SSL/TLS )

Bluehost uses Let’s Encrypt for the default encryption. Let’s Encrypt is often said weak ( only 256bit encryption ), but it is a reliable open-source program. I’m using this encryption, but hackers rarely succeeded their cracking. It is possibly needed a spy.

So there’s no need to change this setting specially.

By the way, to see the site overview, you can find SSL is not active.

But this URL is started from ” https:// “, so it has already done the encryption. If you don’t buy ” Single Domain SSL ” at the contract, it is supposed to indicate. Single Domain SSL is like an insurance, so you don’t need to buy soon.

2. Reset password

At the contract, Bluehost requires a strong password, so it’s not necessary to change the password. But it is said that the strong password is twelve digits or more, if your password is not so, you should change the password.

Going to ” My Profile “, Bluehost requires the configuration of Security PIN, so you must create this security code first. It is required when you will contact with customer support or chat.

Then you change the password. Enter new password until all pull-down menus turn to green. It requires 12 to 14 letters ( at the contract, it requires 8 to 16 letters ).

This is for Windows
This is standard editor “Notepad”

After entering new password, press to appear the password, then save it as a text. It’s good to save your ID together. Your Bluehost ID is on ” My Profile ” at the top-right corner.

You save it to USB memory, then hide it somewhere. Do not stick your ID & password on the monitor.

Lastly, you are going back to Bluehost’s site, and press the save button ( ).

Pasting from the text above, you can enter ID & password correctly.

3. WAF setting

WAF means Web Application Firewall, which will protect your sites or your hosting service. Bluehost itself is not protected by WAF, only your sites can be protected by SiteLock in default. It is a bit weak for security, but for Bluehost has a firm entrance control, it doesn’t matter so much.

At the contract, SiteLock is installed unless you uncheck this WAF. It has a function of CDN ( elevate the accessibility ), if you’ve already bought it, it is recommended to use for a while. But if you want to cut the cost, you should cancel to use this WAF. When you do not use SiteLock, all your sites are protected by SiteLock lite. It will send the malware alerts to you. It already has higher security than the free version of Jetpack. In the paid version of SiteLock, it can remove malwares automatically. Jetpack is not so ( need to press a button to remove ).

You can access SiteLock’s dashbord from here.

When you press the button , it is appeared Terms of Services Agreement first ( Sorry, I forgot to capture it ). The progress is like that —— read the terms ( ), check the box ( ), then proceed to dashboard ( ).

Going to Notification, enter your Email address. Then you can get the malware alerts from SiteLock. The email address is better to be able to read from your smartphone.

4. Access Log setting

Bluehost can get the access log from cPanel. It only can get the accesses of your sites, and hard to understand. However, it is useful for evidence.

It’s okay to configure it.

I don’t recommend to check the button under , which is ” Remove the previous month’s archived logs from your home directory at the end of each month “. Because hackers would try to access illegally on the last day of month ( The unauthorized access to me was done so ). They are considering about cPanel.

You should delete these logs manually.

Anyway, you can see these logs from both cPanel and File Manager. Seeing from file manager is a bit faster than seeing from cPanel ( Raw Access ).

To see it, there needs an extractor of .gz file ( GZIP format ).

It is quite useful when you will prove the hacking at the court.

5. FTP setting

FTP means ” File Transfer Protocol “, which needs the old-style homepages ( HTML language ). WordPress is written in PHP language, it doesn’t need FTP software specially. Also, WordPress has a file manager as plugin separately.

But there is a risk that the plugin of file manager cannot work when the site is broken. Bluehost uses a separated file-manager so that you can go back to file-manager then correct the broken files.

It can be seen the structure of your hosting service

This file manager cannot be connected by FTP software, so you can avoid the file falsification by remote. If you need a large number of uploads, you have to configure SSH and use SFTP software. But it’s rarely needed.

By the way, Bluehost cannot be deleted this FTP, because its file-manager uses FTP.

But it’s just okay you will establish a firm entrance control.

6. Email setting

Bluehost’s email is a bit difficult to access. Do it like this.

This proccess can be skipped by checking ” Open my inbox when I log in “

This is system email so that you cannot export it to other mailing softwares. To receive emails from your smartphone, you have to create a new mail account. Otherwise, you must access this mail box frequently.
cPanel’s mailer is seemed that the forwarder and autoresponder can only be used between cPanel’s mail accounts, and system email account cannot be exported to other mailing softwares. It’s better to create a new mail account.

Creating a new mail account is below.

Open a new mail account, there posted a mail for manual setting. You export it to your mail account which you can receive the mail arrival notification on your smartphone.

The below is a case of using Gmail.

It is succeeded when the emails from cPanel is sent. You can ignore the failure alerts.

Doing this, it is capable to receive emails from your smartphone.

It’s good to change the email address of SiteLock to this (). In this case, ” michirojohn@gmail.com ” is changed to ” niceguy@michirojohn.com “.
You can receive the security alert on your smartphone.

By the way, Jetpack send a security alert to your ID. No need to change.

7. Backup setting

If you don’t buy ” CodeGuard Basic ” at the contract, there is no backup in your sites.

It is weak for making a site when something wrong is occurred on your site.

There is four ways to get the backups ;

1. Buy “CodeGuard Basic” or higher
2. Buy Jetpack’s “VaultPress Backup” plan or others
3. Use a backup plugin in a WordPress site
4. Use Backup Wizard of cPanel then buy “Cool File Viewer”

The cheapest one is No.4. Do it from cPanel. But there is the need to buy “Cool File Viewer” and also difficult to use. Next cheapest one is No.3. Some plugin can be used for free. But there is a risk not to restore files when you cannot access the site. And also cannot backup daily for free.
My recommended one is to buy CodeGuard. It only costs an annual fee and not costly. Then you can get the daily backups. And also easy to use.

However, “CodeGuard Basic” can only restore up to 1GB, but my backup at default is 936.88MB. You would have to upgrade the plan soon. “CodeGuard Professional” can restore up to 5GB, and it is cheaper than Jetpack’s.

Bluehost also prepares Jetpack plan, but it is costly. . . It is an option when you will have to backup a huge site.

If you want to cut the cost, there is a way (^^;.

In exact, the threats by malware rarely occur on WordPress. I’ve never faced at such threats for many years. Most threats are the conflicts with plugins or between a plugin and WordPress. In worst, the site appearance will be broken ( I’ve never faced at not to access my site by plugins ).
To avoid these conflicts, you should stop the automatic update of plugins.

Uncheck automatic updates

It’s not troublesome to update manually. You can do it from a WordPress site easily.

And the plugins are even kept automatic updates after doing it.

Then, you update the plugins from a clone site. It is called ” staging “.

Bluehost has a function of staging a site, so you can make a site from there. After making a draft on it, then upload (deploy) to your live site. You also can update plugins from there. After confirming no conflict, you deploy the change of site.

The way is like this.

create a clone site
deploy to a live site

When you find a conflict, delete a staging site, then create a new staging site. And then you inspect the reason of conflict.
Most updates are not needed to do immediately, so it’s okay to update after not receiving a vulnerability report from WordPress.org or SiteLock.

It is once a week supposedly.

It can be used instead of backup, but there is a case that you cannot notice the conflict. So it is much safer to use a backup program. CodeGuard can restore a site even if your site is broken.

But in any case, you should stop the automatic update for security.

8. Other settings

a. Limitation of Login attempts

Bluehost limits the login attempts originally. The limitation is five times.

It is not using reCAPTCHA (^^;.

There is no way to change it, but it’s not necessary.

b. Acceleration of site

Bluehost prepares Cloudflare as free CDN, which can accelerate your site.

Watching the setting, there is a case that Cloudflare is not on, so you have to check it for all your site. It’s very easy to activate Cloudflare. Just a press. It is an excellent point of Bluehost. Many hosting services cannot do it like this.

Cloudflare had an advantage for acceleration and affiliate.

c. Payment

Bluehost only can use PayPal as online payment service ( as of April 2024 ). It is a bit disappointed at I cannot use Google Pay and Apple Pay. In addition, when I wrongly pressed the upper plan payment, the payment was done without a confirmation dialog appearing. I asked for cancelling it to Bluehost customer support, but they refused it as not to do it. If you mischarged by a wrong click, there is no way without terminating your contract.

Be careful when you press the payment button.

And this upgrade is only applied for your current seeing site. Other sites are not applied. You should be careful about upgrading a plan.

9. 2FA ( Two-step authentication )

When you finished a contract, you’ve already had 2FA as a simple email code. This verification disappears after the verification is succeeded ( It would take for several times ).
It is like a Google Prompt.

But in this setting, you can access your site from other PCs or mobiles. It is weak for unauthorized access. To think so, Bluehost asked me to configure 2FA. It looks like something tricky (^^;. It is not certain whether it is caused by my unauthorized access from an untrusted device.

If you can see this suggestion, you will configure this 2FA without hesitation.

Even if you refuse it, you can configure this 2FA from “My Profile” later.

This is for Windows

Once you configure this 2FA, you have to enter the verification code every time. It will bother you, but it doesn’t matter because there is a way to access your sites directly ( The way is mentioned after ). It doesn’t bother you.

So you should elevate the security higher as possible.

My recommended settings

1. Not to buy SiteLock
2. Buy CodeGuard Professional
3. Stop Automatic update of plugin
4. Import Email account to your smartphone
5. Edit a site from staging site
6. Configure 2FA by email

The reason why not to buy SiteLock is that WordPress rarely suffered malwares. If you want a complete security, you will buy. But as the paid version of Jetpack can do the similar thing, it’s good to wait for a while. The case you will buy the complete plan of Jetpack ( but it would be costly than your Bluehost plan ), there is no need to buy SiteLock and CodeGuard. This Jetpack has both. You will consider which fits you.

Security on a WordPress site

WordPress.com prepares an example site, whereas Bluehost prepares a navigation to make a site for your purpose. This navigation is so excellent that you can make a smart site quickly.

WordPress.com’s example is like this ;

We can enjoy a parallax effect.

1. Encryption

Both WordPress.com and Bluehost have the encryption from the beginning. They keep the safe telecommunication. Inversely, I don’t hear the rumor of untrusted telecommunication. But seeing a site, something afraid of is occurred.

You can change “http” to “https” if you want.

The site’s URL is sometimes started from ” http:// “. It looks like no encryption, however, to see the address bar, URL starts from ” https:// “. So it is not necessary to change it. When you add Cloudflare, this URL changes to ” https:// ” automatically. If you revert this URL to ” http:// “, you cannot get to access your site by Cloudflare. In this case, you can access again by removing Cloudflare. Bluehost can easily do such an operation.

Nothing to say, it’s much safer not to change URL.

In addtion, WordPress.com users don’t need any changes.
It starts with ” https:// ” from the beginning.

2. Configure Jetpack connection and security

Bluehost has a high compatibility with Jetpack, it elevates the accessibility and security.
It’s better to connect with Jetpack.

If you don’t have WordPress.com account, you should create WordPress.com account first.
The configuration is above ( Click here ).

Doing this, you can access your sites directly with one click.

You also should configure Jetpack’s security.

Doing it like this.

Default setting of Jetpack on Bluehost ( as of April 2024 )

If you check “Downtime monitoring”, you can receive an alert when your site is offline. It is a measure for the server is down or your site is broken by the destruction by hackers or by yourself. You should turn it on.

“Firewall” is not needed because SiteLock is already running on Bluehost. If you want to use a block list (blacklist), you activate “Firewall” then activate “Allow Block list”.

“Brute force protection” limits the login attempts to 20 times. After the 10th attempt, Jetpack requests a simple question every time. It means that Brute Force Attack would be stopped for 10 times. It is common limitation of login attempt, which is less than reCAPCHA (^^;.

“WordPress.com login” makes you easy to access your sites. When you launch your site directly, it makes you easy ( four above picture ). It is like ” Passkey “, which has high security. It requests to enter your ID & password, when the access from an untrusted device is coming. Probably, the brute force attack would become harder, because the login screen is hiding as option.
Anyway, as it uses 2FA layer for verification, you cannot get to use other security plugins for 2FA.

3. Set a website icon to your desktop

If you set a website icon to your desktop, you can access your site directly. It can get to access your sites without accessing your web hosting service. It’s quite troublesome to enter ID & password every time. The case when you must enter 2FA code every time is more trouble.

Shortcut this process.

In WordPress.com, the initial domain is your home screen.
It just okay to add this page to favorites.

First, push “” or home button, you come to home screen. Then push icon, you register this page to Favorites. It’s the same for both Google Chrome and Microsoft Edge.

When you drag&drop this favorite to desktop, you can access your site without launching a browser.

Google Chrome can move it to desktop with Drag & Drop.

Microsoft Edge cannot do it so that you have to get it Favorites folder in C-drive ( it is in USER folder ), or create application for it. Edge can launch a site as application.

In Bluehost, it is a bit complicated setting a website icon on the desktop.

It is not certain what the password of your site is.
You must configure it first.

The website of Bluehost’s is initially displayed the top page of Bluehost Plugin, which is not useful a little. It cannot display the information from plugin. As the security information is not displayed either, you should change the starting page.

Before doing this, you change the password. It is not certain from the server.

Windows standard editor “Notepad”

The save button ( update profile ) is farther at the bottom. The change is not updated before you press the button .

After you can know your ID & password, set a site icon to desktop.

Doing this, you can access the dashboard of WordPress directly.

Launching it, a login prompt is appeared. When you press the button , you are requested to enter ID & password at first. So you will enter your ID & password. It’s good to use the text which you saved above. After you succeeded to verify, you can access your site directly with just a click ().

There doesn’t need to check ” Remember Me “, when you will use this verification.

4. Staging a website

Bluehost has an excellent function to make a staging site, which can edit your site without editting a site directly. It is quite useful for changing an entire site or correcting the conflict with plugins. You should configure it.

Let a staging site make an icon on the desktop, too.

All your editing ( including the updates of plugin ) should be done on this staging site. If you don’t find anything of trouble after updating or editing, you go to Bluehost plugin then push “deploy”. If you find something of trouble, you delete this staging site then remake it.

The changes are updated with just one press.

It’s easy to go and go back to a staging site or a live site.

WordPress.com sites don’t have this function. Neither has an external File Manager. So it becomes hard when you’re facing on a trouble. It needs backup of Jetpack ( Not plugin’s ).

5. Set an icon to your mobile

After you access Web Hosting Service from your mobile, you launch a site. Then go to WordPress’s dashboard, and then add this page to favorites.

In Bluehost, just type ” Bluehost ” in the search box, you can go there.

In WordPress.com, it’s good to use ” Jetpack – Website Builder “.

Just okay to choose a site, the front page is changed. You can use it for a direct access.

If you want to create an icon to access directly, press “More” then go to “WP admin”. It appears a WordPress page for PC, you add this page to home screen ( same way of to ). It can use for other hosting services including Bluehost.

Doing this, you can launch your sites as like a mobile app (^^;.

Jetpack-Website Builder cannot seem to resister a staging site. Make it from Bluehost server.

6. Configure 2FA to a website

You should keep in mind that your Web Hosting Service has a different login screen from your sites. If you will configure 2FA on your server, it doesn’t make your sites configure 2FA.

In Bluehost, 2FA by email is not applicable to your sites.

In WordPress.com, the primary domain is also your login screen. So you can configure 2FA if you have already configured 2FA.

Both Bluehost and WordPress.com can access your sites with WordPress.com account, that is the excellent function. It can provide a direct access securely and easily. Even if it occurs unauthorized access, the limitation of login attempts will prevent it ( Jetpack will do it ). It can be said it’s safe.

But it has a weakness when your ID & password are leaked.

For this countermeasure, there is a way to configure other security plugin. My recommendation is Wordfence, which can create a passwordless environment for 30 days. But it is incompatible with Bluehost, I failed to establish the passwordless environment with this security plugin. It can neutralize 2FA only. I have to enter my ID & password every 6 hours.
Therefore, I don’t recommend you to use other security plugins. You should use Jetpack security.

And it is supposed better to change password regularly.

It is a basic way to keep a site secure. The interval is not certain. In my experience, although I did not change the password for many years, any hackers could not break through my login screen. Nothing to say, I used a strong password and login attempt limitation. To use both, you can get strong security.

It might be okay to change password when you feel something wrong.

The sixth sense will keep your security (^^;.

For the reference, I show you how to configure Google Authenticator by Wordfence.

Security on Users

The WordPress settings are finished. In short, you can create a zero trust environment if you set up two-step authentication using like Authenticator. Many internet environments like so, such as Google accounts. However, these environments have many differences from others, so it is better to look at each detail. My conclusion is that the default settings are not optimal.

Even if you’ve built the highest level of security, the information leaks and hacking can occur if users cannot act carefully. So I will mention about the security actions that users should take finally. Some of them are written in the text.

1. The best security is in your head
2. Lock your screen when you leave your desk
3. Built passwordless environments as possible
4. Do not upload personal information
5. Do not back up your Authenticator QR code
6. Do not click or tap on unknown URLs
7. Do not update plugins automatically
8. Deactivate themes or plugins that have been found to have vulnerabilities
9. Change your password immediately if there is unauthorized access

You will make a site with passwordless environment as possible. Some professor reported there is a way to determine ID & password by typing strokes, thus, it’s much safer to use Social Login or Jetpack’s Login than typing directly. It seems to be okay to use browser’s cookie, which we always can see.

Hackers can know your IP address from a site access. It can determine your site’s URL from your IP address, then doing a brute force attack. Seeing the access log, you can easily determine what IP would try to unauthorize your site. It even shows which internet provider the IP is using. The security plugin Wordfence will send the IP address and its internet provider when an unauthorized access occurred.

This is the personal information which hackers can know primarily.

When you receive an email from the unknown, if you will press the URL on email, there is a case redirected to the hacker’s site. Then the hacker might do the brute force attacks to your site. This hacker would do it using the same internet provider which you are using. Because it is hard to be noticed by you.
Therefore, you are sure not to press URLs easily. You only press URLs which are known well. But it’s okay only to watch the images and videos in the email. Because recent emails are protected by security. Playing videos is also fine. Carefully watch the content of images and videos, then you will visit the site.

WordPress always reports any security vulnerabilities, so it’s almost enough for security measures. A usual seen vulnerability is ” cross-site scripting “. There is a possibility that your personal information would be leaked in the way above ( you wouldn’t be able to understand it either more when you read the books about it. . . ), but it seems like you don’t need to worry so much. It can be avoided if you don’t enter your personal information into the displayed site. The threat often said will be prevented only by doing this. I have never seen it with a WordPress themes or plugins. You understand it just a possibility to be leaked from your IP address to your internet provider.

In addition, if you find the login attempts by hackers, don’t go to their sites by using their IP address. It is just telling them your IP address and internet provider. They possibly determined your site only from IP address, they haven’t known your internet provider yet.

If you received a vulnerability report, remove it manually or press the “deactivate” button. You will do it within the appearance is not broken. I’ve never received the vulnerability report which all the personal informations are leaked. It would need “Backdoor“, but Jetpack or other security programs are always monitoring whether such connections are alive or not.
It would be better to wait to update for a while. After not receiving the vulnerability report, you will update them. If you will do it, you can prevent the conflicts between plugins. If not, it becomes harder to restore your site from backup, that the site you did not edit for a long time.

Anyway, you will read the vulnerability report definitely. If there is a sentence ” This update includes the patch for security measures ” or like that, you should update it immediately.

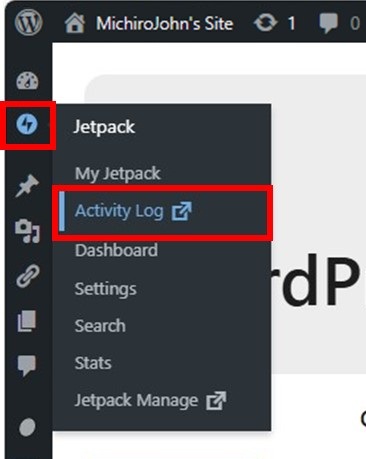
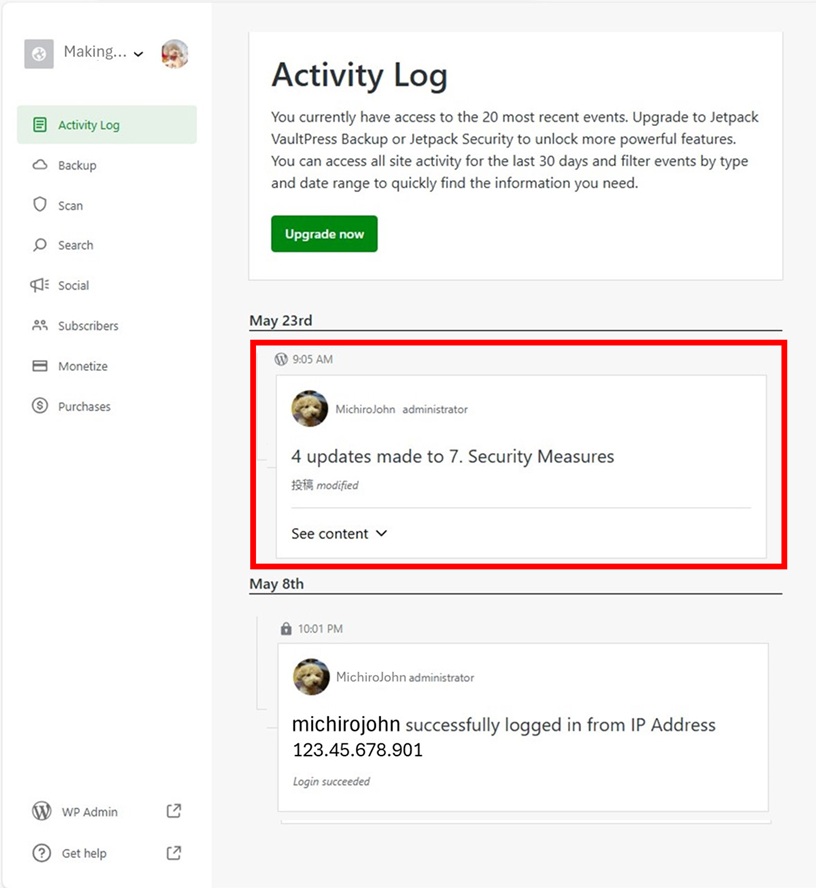
If your site is hacked, first change your password, then change your two-step verification when you have time. In the meantime, check the activity log to know the changes ( you can see any changes if you installed Jetpack ), and if you find any falsification, revert back to a backup before that date.

WordPress.com users need to upgrade for using it

However, you can’t get back your stolen personal information.

Always do your best to avoid being stolen by others.

That’s all.

—— Well, there are many difficulties on WordPress. I believe the security measures is the most. WordPress is sometimes said the security is weak. But it can elevate the security stronger than others. WordPress is a web application which gives you a lot of joy after going through it. You will do a lot of things soon. So you will do your best without giving up.

People all over the world will wait for you. You can make new discoveries from there.

You got it !

Leave a comment(コメントを残す)

Copied title and URL